|
|
|
|
|
|
|
|
 |
|
|
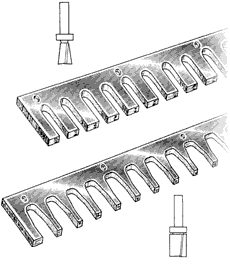
Cutting the dovetail sockets, or "tails."
Place the dovetail template on the end of this board. You will be cutting a single dovetail socket down each slot of the template. Locate the template by eye or measurement and clamp in place. Set the dovetail bit in your router. |
|
 |
|
|
 |
|
|
| Set the dovetail router bit depth so that the socket will be cut deep enough to accommodate the thickness of the adjoining board. With the Keller Dovetail System, both boards do not have the be the same thickness or width, and — unlike all other dovetail jigs — the fit of the joint is constant. It is completely independent of the depth of cut of your router bit or the thickness of your boards.
Notice that the Keller System uses a precision ball-bearing guide on the shank of the bit, instead of a guide bushing in the router base. This innovation, pioneered 27 years ago, insures the accuracy of the cut: the guide is always centered to the bit, there is no wear to the template, and the template slot is milled to match the size of the bearing precisely. No slop, no waste.
Just a single pass of the dovetail bit cuts each dovetail socket completely.
|
|
 |
|
Cutting the pins.
The trick in dovetailing, of course, is to get both halves of the joint lined-up with the pins cut the right size in the right place so that the joint halves fit snugly and the edges of the boards are aligned. The Keller System borrows an age-old method to ensure this alignment simply. |
|
 |
|
|
 |
Place the board that will be cut for the pins vertically in your bench vise, again, face out. Take the dovetail board you just cut in Step 1. Put it on top of the pin board so the sockets overlap the end grain and the edges of the board are lined up. Then scribe one of the sockets into the end grain with a pen-knife, much as would be done when hand cutting.
This gives you two scribe marks, exactly the size and location for that pin. Place the pin template on top of the end of this board. The fingers of the pin template will match the pair of scribe marks exactly. What you see between the fingers is exactly what you will cut: no offsets, no measuring, no test cuts, no trial and error, no wasted lumber.
The Keller System uses a pattern bit — the straight bit and ball bearing guide are same diameter. This bit, invented for Keller in 1977, means the Pin Template is exactly the same size as the finished cut. That's why the layout and alignment are so simple and accurate. This also becomes the foundation for variable spacing.
Set the pattern bit depth so that the pin will be cut long enough to go through the first board. Cut out the waste, leaving the pin standing under the template fingers.
The joint is now completely cut and ready for gluing and assembly.
|
|
 |
|
|
|
|
|
|
|
|
|
|